Bethesda games play better with mods. It’s almost a universal constant at this point even if it may lead to game instability when not handled properly. Frankly, the act of modding the game can be just as enjoyable as playing it. Browsing mod lists opens up a realm of possibilities and induces a state of excitement for what could lurk on the next page and conjures up wild images of the nonsense you might stumble across the next time you load up your save. Fallout 4 mods are no exception to that rule.
Modding can be a daunting task to dive into, however, and it’s understandable to fear corrupting an installation of Fallout that requires rolling back your mod list or even reinstalling the game, but you can avoid most of that heartache if you know what you’re doing before you dive into the deep end of the modding pool. You even have a few options on how to proceed.
Fallout Creation Club: Paid mods, easy installs

Chances are you heard about the lukewarm response Bethesda received in response to its Creation Club launch. Yes, there are issues with the platform. No, you’re probably not going to get as much out of it as you would with free mods. The upside? It’s simple to use and all the mods are specially made for the Creation Club system, meaning they’re tested and working with one another and all of the game’s official content.
The downside is, of course, that you have to pay for them. It’s nice to be able to sleep soundly with some guarantee your paid-for content will work right out of the gate, but it does remove some of the fun of cobbling together the jigsaw puzzle that is a complicated suite of Fallout 4 mods.
The process is fairly simple: Creation Club credits are purchased through your platform of choice, depending on if you’re playing on the PC, Xbox One or PS4. These credits are spent in the Creation Club, which can only be accessed in-game through the main menu of Fallout 4, where you can browse through mods to your heart’s content and buy whatever tickles your fancy.
Navigate to your in-game mods menu to ensure your mods are activated, start your game, and chances are you’ll be given a quest marker to follow for your new goodies or you’ll just be given your new and shiny things outright.
It’s straightforward, but it can leave a little something to be desired. Want to go deeper down the rabbit hole?
Fallout 4 free mods

Browsing through the Fallout 4 Nexus is one of the quickest ways to get an idea of what you might like in your game. You can browse by mod type or category, see what’s currently popular or take a look at the most often downloaded mods to see what the community finds most interesting. Fair warning: Some mods are not safe for work, but you can choose to filter results by their work safety level.
Here are a few suggestions for places to start, based on popularity and freshness as of the time of this writing:
- Full Dialogue Interface: See what your character will say before you say it
- Homemaker: Expanded Settlements: Add over 1,000 new items to your settlement customisation options
- CROSS Courser Strigidae: Custom high-tech armour for your Institute playthroughs
- Unofficial Fallout 4 Patch: Fix game bugs both big and small
- True Storms: Wasteland Edition: Spice up the Wasteland with an enhanced dynamic weather system
That’s barely scratching the surface of what Fallout 4 mods can look like. Add new weapons and armour, overhaul the combat system, tweak the interface or fix anything about the game that drives you crazy. Fallout 4 is the canvas and you are the artist with the power to create to your heart’s content, but be wary of crashing the game in the process.
Custom installation

So you’ve downloaded mods that strike your fancy. Now what? You’ve got two options: Manual installation, or automated installation through a program such as the Nexus Mod Manager.
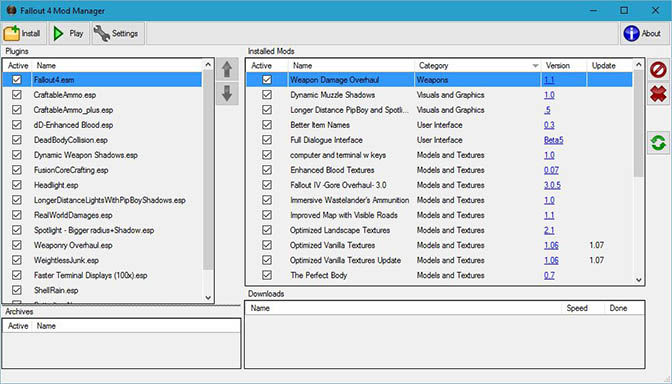
Personally, I’ve had the best luck with using the Manager to ensure mods install properly and that I don’t leave any files behind. It’s just more convenient, too: Point it at your Fallout 4 directory, drag and drop mods you want to install or link your Nexus account to the client to automate the downloading process. They’ll be installed simple as that.
Make sure you’ve enabled mods in your game by navigating to your Fallout 4 folder under Documents\My Games\Fallout 4. Open the file named Fallout4Custom.ini. If it doesn’t exist, create a new text file with that name and extension. Add the following text at the bottom of the file, then save and close the said file:
[Archive]
bInvalidateOlderFiles=1
sResourceDataDirsFinal=
You should be good to go. Simple, yeah?
For those brave enough to manually install Fallout 4 mods, find your installation directory. By default, it’s likely in:
C:\Program Files\Steam\steamapps\Common\Fallout 4\Data
Extract the contents of your chosen mod to this folder, unless the mod contains a folder named “Data” of its own; In that case, extract the contents to the Fallout 4 folder directly.
From there you’ll need to navigate through the in-game options to find the mods menu and ensure your new mods are listed as activated. If you run into any problems along the way, refer to the previously-linked guide for troubleshooting steps.
If you’re looking to give the Wasteland a new coat of paint, adding Fallout 4 mods into your rotation can be a breath of fresh air in a well-trodden playthrough. It’s your game and you should have fun playing it, so go wild!


By Andrej Kovacevic
Updated on 15th December 2017